Effective sound treatment doesn’t have to be pricey.
You can do it simply for almost nothing if you already have your basic podcasting equipment with you (software, microphone, etc.).
My family has started a new lifestyle – traveling full time – and until we get our RV I’ve had to make do with some pretty unusual and less-than-ideal recording conditions.
So I’ve had to get creative – because as they say, “Necessity is the mother of invention.”
For this episode I’m demonstrating my attempts to create my own sound treatment solutions out of nothing – or almost nothing. And I do it step by step so you can actually HEAR the difference in the audio as I go along.
It’s a short episode – but I think it will show you that your recording situation may not be as hopeless as you thought.
- [1:18] My situation has changed – and my recording situation is a bit difficult as a result
- [3:39] Pre-treated room sound – no windscreen – open windows – tile floor – hard surfaces
- [4:41] Closed the windows/doors – much less ambient sound
- [6:10] Adding the foam windscreen – often better than a pop screen
- [7:11] Less hard surfaces by adding a blanket to the table my computer is on
- [8:06] A tremendous difference from a DIY sound booth using couch cushions
Other Goodies Mentioned On This Episode
Connect to schedule a one-on-one or group training: carey (at) PodcastFastTrack.com
Subscribe to Podcastification In Your Favorite App or Directory

I had to create sound treatment for a terrible room – over and over and over
I had to do it repeatedly because my family and I just moved into a new situation – we’re traveling. That means we have NO REGULAR PLACE for me to do my podcast recording.
I didn’t think it would be a big deal. Just find a quiet place and record.
But that’s a lot harder than you think it is.
There are all kinds of things you don’t think about that figure into the sound you get in a recording:
Hard surfaces in the room reflect sound instead of absorbing it
And the room where I recorded THIS episode had tile floors, very little soft furniture in the room, and large windows.
All of those things add up to sound waves bouncing all around the room.
The result is what I refer to as “room noise” – it produces an echo-y, hollow tone to your voice that sounds like you’re recording in the public bathroom at the bus terminal.
Don’t forget about the surface your microphone is sitting on
In my case, I was using a dining room table. Think about it…
Wood.
Combine that with the tile floors and the large room and you’ve got a recipe for echo.

The condition of your room is the most important thing when recording
I often – OFTEN get emails from clients about an echo-y sound in their guest’s side of the recording. The request is always the same…
Is there anything you can do to remove the echo?
My answer is always the same… nope – not much.
Why?
Because if you record in a bad room – you’ll have a bad recording. There’s no way around it.
So the first thing you need to do in order to get a GOOD recording is to address the issues in your room.
Yeah, I know – you can’t control the room your client is in – can you?
Yes, you can. Sort of.
Give them tips about the type of room they should go to for your recording. If you don’t, they’ll sit in their office to speak to you – or worse yet, they’ll plan to do it in their car on the way home from a meeting using their smartphone.
I recommend all my clients create a “How to prepare for our podcast conversation” sheet that highlights the best practices guests can do to maximize the recording.
You can download my template and modify it however you like here: https://podcastfasttrack.com/ForMyGuests
They won’t always read it. But those who do will save you a load of headaches later.
But we’re talking about YOUR room primarily, so what can you do?
Most sound engineers or studio designers will tell you that you need to “soften” the room – adding acoustic foam in strategic places to soften the “reflection points.” You can see more about how to do that here: https://youtu.be/akiWq97dSBA
But I’m traveling. I don’t have the extra cash to spend on that kind of stuff – AND I’m not able to do anything permanent to the places I’m staying.
These are VRBO and AirBnB rentals. The home owners are not going to appreciate the sound treatment I attach to their walls, no matter how much money I spend on it.
So I had to figure out something else, something that was…
- Simple to pull off
- Inexpensive
- Non-permanent
- Effective (that’s the key)
This episode walks you through what I did and gives you sound bites of each step along the way so you can actually HEAR the differences each modification to my room made as I did it.
Keep listening.

You can add sound treatment to any room VERY inexpensively
OK, let’s get to it. Here’s what I had to work with…
- A room full of hard surfaces
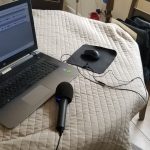
- My Audio Technica 2005 USB microphone (see the picture)
- My laptop with Audacity loaded on it
- And a mind full of creativity 🙂
 I decided to add layers of sound treatment one step at a time, in this order
- Using the microphone alone in the room as it is
- Adding a windscreen that goes directly on the mic (see the picture)
- Adding a blanket to the surface of the table my laptop sat on (see the picture)
- Using the cushions from the couch and chair to create a “sound booth”

Listen to the audio. You’ll hear slight differences at steps 2 and 3 , but when it gets to step 4 – WOW.
Suddenly the echo-y room sound was gone, my voice even seemed deeper and richer, and the ‘hiss” of background noise was almost non-existent.
Why were the cushions so effective?
Most people try to treat the room itself in order to do away with sound problems… and if you can do it, that’s great. You’ll have a permanent solution to your problem as long as you record in that room.
But if you need to be mobile or need to record in someplace other than that room, adding sound treatment to the room itself becomes impossible.
So rather than treat the room, isolate the microphone.
In my situation here’s what was happening…
The sound waves from my voice were definitely going into my microphone – too many times.
What I mean by that is that the sound waves were bouncing around the room furiously, and my microphone was picking up ALL of them.
That’s what gives a recording in a hard-surface room that echo-y, hollow sound.
So the couch cushion solution blocked the sound waves from two different directions.
FIRST – it trapped most of my voice INSIDE the cushion cube I created it.
SECOND – it kept any sound waves from my voice that got OUT of the cushion cube from coming BACK into the microphone – mostly.
Listen to this episode and you’ll hear the difference yourself.
If you want to hear the before and after one after another, listen to these sections back to back…
- [3:39] (before any sound treatment)
- [8:06] (after the couch cushion cube was applied)
Pardon this quick note from one of our partners
Know anyone who could benefit from this episode? Share it now!
[addtoany]


